Running BlueStacks (an Android emulator) is a bit complex because it requires the system to meet certain hardware specifications, such as a good graphics card and hardware virtualisation. Most VPS environments, especially typical ones, lack the required GPU resources which means poor performance or failure of VPS for BlueStacks.
However, if you want to run blue Stacks on a VPS
1. Search a VPS for BlueStacks:
- CPU: At least 4-6 cores (blueStacks will need multi-core support to operate smoothly).
- RAM: A minimum of 8 GB (16 GB and more is better).
- Disk: SSD storage to enable faster data access.
If you are a provider, you can check if nested virtualisation is enabled on your dedicated node where you are hosting the VPS.
To check if nested virtualization is enabled on an AMD system, open your terminal and run the command.
cat /sys/module/kvm_amd/parameters/nested
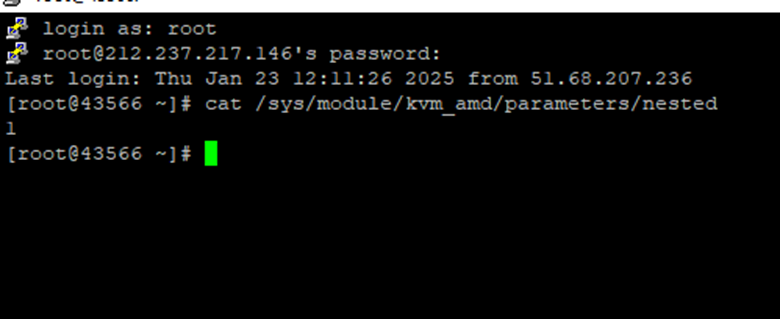
If the output shows “1” or “Y”, then nested virtualization is enabled.
2. Operating System required on VPS for BlueStacks
- BlueStacks operates well on Windows and MacOS, but you can get it done on Linux using a Windows VM.
- Look for Windows VPS (Windows Server 2016/2019) for a better compatibility to run BlueStacks.
3. Enable Virtualization:
- Do ensure that Intel VT-x or AMD-V (hardware virtualisation) is enabled
- In the BIOS of the VPS, as BlueStacks needs these features to work properly.
- Most VPS providers fail to enable hardware virtualisation; therefore, check whether it is available or contact your provider.
Key steps:
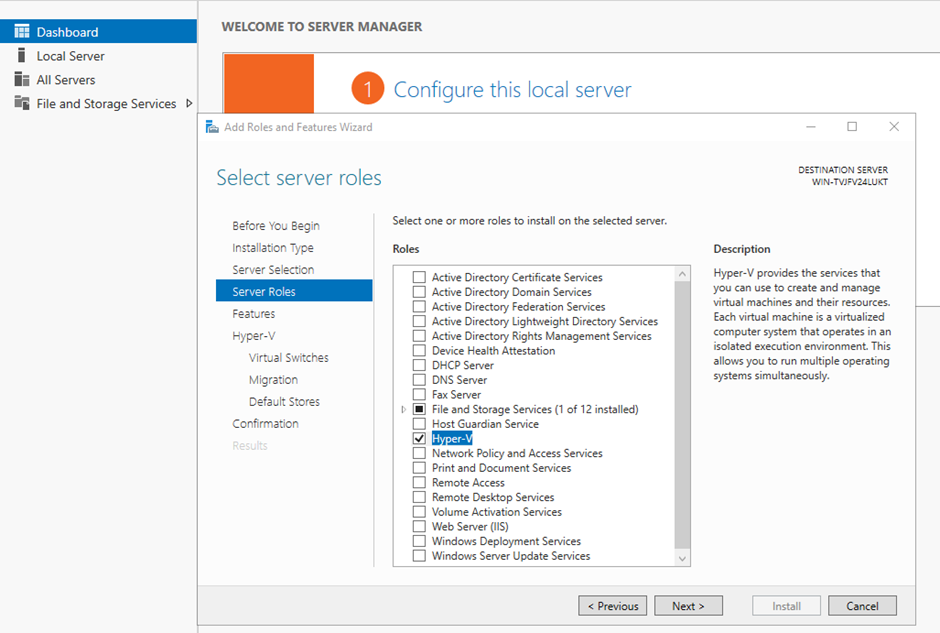
- Access Server Manager: Open the Server Manager application on your Windows Server 2019.
- Initiate the Add Roles and Features Wizard: Go to Manage > Add Roles and Features.
- Select Installation Type: Choose “Role-based or feature-based installation.”
- Select Destination Server: Specify the server where you want to install Hyper-V
- Choose Hyper-V Role: On the “Select server roles” page, select the “Hyper-V” role.
- Confirm and Install: Review the installation options and click “Install” to begin the process.
4. Set Up the VPS for BlueStacks
The whole point of the matter here is that you will have a Windows VPS that is quite performance-friendly and then you can go ahead with the installation of the Windows version of Blue Stacks.
Steps:
- Connect to your VPS using Remote Desktop Protocol (RDP).
- First you need to check if virtualization is enabled.
- Go to task manager > Performance.
- Check at right-bottom corner as given in image.

5. Download the latest version of Blue Stacks from its official website.
- Download Blue Stacks installer from the official website: https://www.bluestacks.com/.
- Run Blue Stacks Installer on your system, check the terms and conditions, choose the installation location, and start the installation process.
- When the installation of Blue Stacks has completed, set up the Google Play Store with a Google account.
- This is where you start and use Blue Stacks to download and run Android applications.
6. Possible Limitations:
Performance: Even with a highly performance VPS, BlueStacks won’t perform as well as it would on a local machine, in view of this, shall we say, if the VPS does not have a dedicated graphics-processing unit.
Graphics acceleration: If the VPS does not provide GPU acceleration, the performance might suffer greatly.