
Introduction to Virtualizor
Managing a VPS is straightforward once you know how to access its key resources. These resources include RAM, IP addresses, disk space, and virtualisation type — all of which directly affect the performance, connectivity, and stability of your server. Virtualizor, a reliable VPS control panel developed by Softaculous (the company also known for its popular web application auto-installer), makes it easy to monitor and manage all of these from a single interface.
Whether you are a beginner or an experienced administrator, being able to access this information is essential for keeping your server healthy and your hosted services running smoothly. Virtualizor supports multiple virtualisation technologies including KVM, Xen, OpenVZ, and LXC, and provides an intuitive web-based interface for monitoring resources, installing operating systems, rebooting servers, and managing backups.
Accessing the Virtualizor Control Panel
Before checking your VPS details, you need to log in to the Virtualizor control panel. Use the credentials provided by your hosting provider, or log in through their client area. Virtualizor can be accessed at the following default URLs:
http://your-server-ip:4082 (End User Panel)
http://your-server-ip:4083 (Admin Panel)
Replace your-server-ip with your actual server IP address. Most users should access port 4082. Port 4083 is the administrator panel and is intended for hosting resellers and server administrators. If your hosting provider has supplied a custom URL, use that instead.
After logging in, you will see the main dashboard, which provides an overview of all your virtual private servers. From here you can access individual VPS details including RAM, IP addresses, disk usage, and virtualisation type.
Checking VPS RAM in Virtualizor
RAM (Random Access Memory) is a critical resource for server performance. It determines how quickly your VPS can process data and run applications simultaneously. To check your VPS RAM in Virtualizor, follow these steps:
Monitoring RAM usage is essential to ensure your server does not run out of memory, which can result in performance degradation or server instability. Virtualizor also displays swap usage alongside RAM. Swap is disk space that the operating system uses as overflow memory when RAM is full. High swap usage is a sign that your VPS may need a RAM upgrade or application optimisation.
Checking VPS IP Addresses in Virtualizor
Each VPS requires one or more IP addresses for network connectivity. Virtualizor makes it easy to identify all assigned IP addresses. Follow these steps:
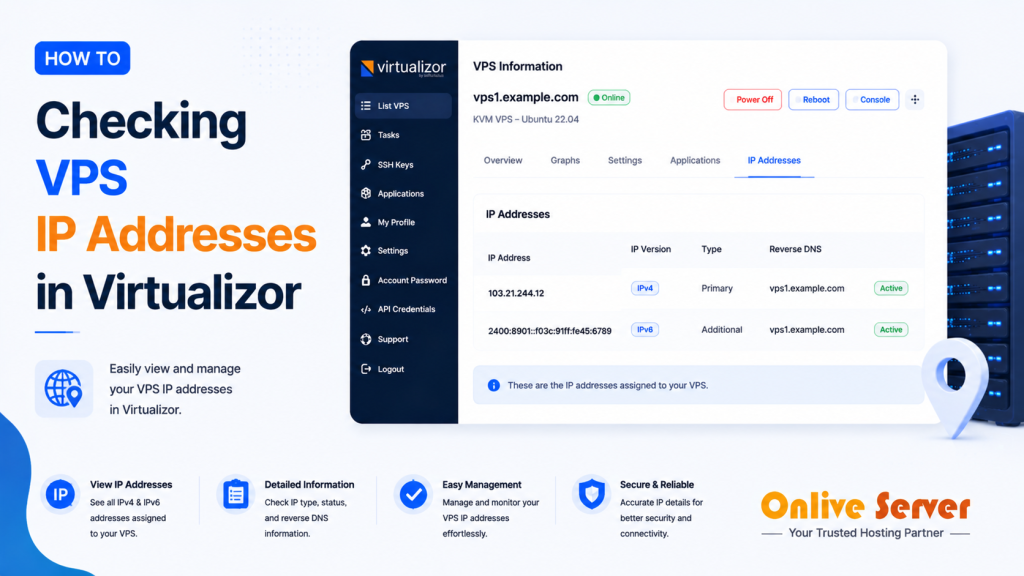
Having easy access to IP details allows you to configure DNS records, set up web servers, and manage firewall rules efficiently. It also helps you troubleshoot connectivity issues by confirming that the correct IP addresses are assigned to your VPS.
Checking VPS Disk Space in Virtualizor
Disk space determines how much data your VPS can store, including the operating system, application files, databases, and logs. Running out of disk space can cause services to fail and applications to crash. To check your VPS disk usage in Virtualizor, follow these steps:
It is good practice to monitor disk usage regularly and take action before storage reaches capacity. As a general guideline, disk usage above 85% of total capacity should be addressed by cleaning up unused files, removing old logs, or upgrading your storage plan.
Checking Virtualisation Type in Virtualizor
Virtualisation technology determines how your VPS is isolated and run on the underlying physical host. Virtualizor supports multiple virtualisation technologies, each with distinct performance and compatibility characteristics. To check which virtualisation your VPS is using:
Here is a brief overview of each supported type:
- KVM (Kernel-based Virtual Machine) — Full virtualisation. Each VPS runs its own kernel, allowing you to install almost any operating system. Offers strong isolation and is the most widely used type for general-purpose VPS hosting.
- Xen — Supports both full virtualisation (HVM mode) and paravirtualisation — HVM mode behaves similarly to KVM, while paravirtualisation requires a modified guest OS but can offer performance advantages in certain workloads.
- OpenVZ — Container-based virtualisation. All containers share the host kernel, making it lightweight and efficient. However, OS flexibility is limited as all containers must run the same kernel as the host.
- LXC (Linux Containers) — Also container-based, similar to OpenVZ. Provides lightweight, OS-level virtualisation. Best suited for Linux-only environments where minimal overhead is a priority.
Knowing your virtualisation type is important for compatibility when installing operating systems, running specific applications, or working with kernel-level software.
Interpreting VPS Resource Information
Once you have accessed RAM, IP, disk, and virtualisation details, it is important to interpret the data correctly and act on what you find:
- High RAM Usage — Your VPS may need additional memory to handle current workloads, or your applications may need optimisation to reduce consumption.
- IP Configuration — Verify that the correct IP addresses are assigned and accessible. Incorrect or missing IPs can cause websites and applications to become unreachable.
- High Disk Usage — Clean up unused files, rotate or archive logs, and consider upgrading storage if usage consistently exceeds 85% of capacity.
- Virtualisation Type — Use this information to ensure compatibility when installing operating systems, running containers, or deploying applications with specific kernel requirements.
Monitoring these resources regularly allows you to maintain server health, improve performance, and plan for scaling as your website or applications grow.
Additional Tips for VPS Monitoring in Virtualizor
Virtualizor also provides additional tools for monitoring overall server health beyond RAM, IP, and disk. These include:
- CPU Usage — Monitor processor load to identify resource-intensive processes that may be causing slowdowns.
- Bandwidth Usage — Track inbound and outbound network traffic to ensure you remain within your plan limits.
- Server Logs — Review logs for errors, warnings, and unusual activity that could indicate a problem or security issue.
- Resource Alerts — Virtualizor allows you to configure notification alerts from the VPS management page. Set thresholds for RAM, CPU, and disk usage so you are notified before resources reach critical levels.
- Backups and Snapshots — Use the built-in backup and snapshot features as a precaution before making significant changes to your server. A snapshot captures the current state of the VPS and allows you to roll back if something goes wrong.
Combining regular manual checks with automated alerts gives you the best coverage for maintaining a stable and reliable VPS environment.
Conclusion
Monitoring your VPS RAM, IP addresses, disk space, and virtualisation type is essential for maintaining a healthy and well-performing server. Virtualizor makes this straightforward by bringing all key server information together in a clearly organised control panel.
By following the steps outlined in this guide, you can quickly check each resource, interpret what the figures mean, and take action when something needs attention. Regular monitoring, combined with alerts and consistent maintenance practices, will help you keep your VPS stable and your hosted services consistently available.